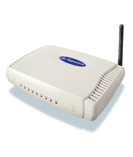
It’s a common problem. You have a Wireless Modem router situated by a phone socket in your home but the wireless signal strength is poor or non existent on the other side of the house or apartment.
You have a number of options to improve the situation.
1. You could reposition the Wireless Modem Router to the middle of the home. This might involve hiring an Electrician to add an extra phone socket (and electric outlet) at the most optimal place in your home. This may also involve ugly cables running along the walls which for some is totally unacceptable. Even after this, the wireless service may still not reach to the outskirts of the home.
2. You could buy a more powerful Wireless Modem Router to replace the standard Bezeq one such as the Edimax AR-7265 (NIS 500). This or even in combination with option 1 could be all that you need to get good reception.
You have a number of options to improve the situation.
1. You could reposition the Wireless Modem Router to the middle of the home. This might involve hiring an Electrician to add an extra phone socket (and electric outlet) at the most optimal place in your home. This may also involve ugly cables running along the walls which for some is totally unacceptable. Even after this, the wireless service may still not reach to the outskirts of the home.
2. You could buy a more powerful Wireless Modem Router to replace the standard Bezeq one such as the Edimax AR-7265 (NIS 500). This or even in combination with option 1 could be all that you need to get good reception.
 |
| Edimax AR-7265 Wireless Modem Router |
However, even after spending all this money you may still not have signal strength at the extremities of your home. On the Edimax models you have the option to extend the antennas using coax extension cable to keep the Modem Router where it is but reposition the antennas to a more central place. Again, this involves ugly cables running along the walls
3. You could buy a Wireless Access Point such as the Edimax EW-7206 (NIS 160).
3. You could buy a Wireless Access Point such as the Edimax EW-7206 (NIS 160).
 |
| Edimax EW-7206 Wireless Access Point |
This extends the wireless Internet reception of your Wireless Modem Router wherever you need it. By placing this Access Point at the edge of the wireless reception area of your Wireless Modem Router where you still get a good signal, the Access Point will then transmit its own wireless service, extending the coverage to cover the whole home. All you need is an Electric outlet at the point where the Access Point is to be positioned.
 |
| Wireless Modem Router overlaps Wireless Access Point coverage |
The Edimax EW-7206 does an excellent job once it's all set up and at a much cheaper price than the previous solutions.
However, be warned, the device comes with no instructions in the box for setting it up for "Wireless to Wireless" configuration.
The only instructions that are included in the box is a Quick Start Guide for connecting the Access Point to the original router via a network cable. In fact, no indication is given in the guide that the device is even capable of being a wireless to wireless Access Point.
The first thing to know is that the correct technical name for this configuration is "Universal Repeater Mode".
The first thing to know is that the correct technical name for this configuration is "Universal Repeater Mode".
Downloading the more in depth Edimax EW-7206 manual from the Edimax site won't help you much either. There is only a very brief reference to a "Universal Repeater mode" option but no attempt is made to explain what this configuration option is or how to configure the device to use it!
I have already spoken to two people who have bought the Edimax EW-7206 in order to use it as a wireless to wireless Access Point.
Both have returned the device to the shop as they were unable to work out how to configure it correctly.
This is a terrible shame as once configured correctly, the device does a great job.
There actually is a PDF file giving instructions on how to configure this device on the Edimax site but you have to really search for it. You'll find it not under Edimax EW-7206 manuals downloads options but under the FAQ link. There you will find a link to set the device up as a "Universal Repeater". The problem is that if you don't know that a "Universal Repeater" is a wireless to wireless configuration then you'll miss the link.
This is a terrible shame as once configured correctly, the device does a great job.
There actually is a PDF file giving instructions on how to configure this device on the Edimax site but you have to really search for it. You'll find it not under Edimax EW-7206 manuals downloads options but under the FAQ link. There you will find a link to set the device up as a "Universal Repeater". The problem is that if you don't know that a "Universal Repeater" is a wireless to wireless configuration then you'll miss the link.
To save you time, here is the direct link to the file:
http://www.edimax.co.uk/images/Image/FAQ/Wireless/EW-7206APg/EW-7206APg_URepeater.pdf
These instructions are relatively straightforward except for two points which need further explanation.
Before I tell you what they are, I have a few pieces of advice before you begin following the Instructions.
- Make sure you have the User/Password for your Modem Router console to hand. The default values will be printed in the Quick Guide that came with the device or a quick Google for "{name of the Router} password" should return the values you are looking for. (See Google screenshot below). Sometimes, the Internet or cable companies change the defaults so you'll have to phone them up to get the correct values. If all else fails, you'll have to do a manual factory reset of the router (by pressing the tiny reset button found on the back of the device with a pen) and reconfiguring the Modem router from scratch. Upon reset, the device will revert to its default user/password and allow you access.
- You'll need a spare Network cable just for the installation. After that its use is no longer required.
- Another point to note is that it's important to give the Access Point an IP Address towards the maximum allowed range of IP Addresses as defined in your Modem Router so that there is little chance of another device trying to grab the same IP Address. (The only way to guarantee that this will never happen is to define the Access Point as a Static Address within the Modem Router. Instructions on how to do this are beyond the scope of the current topic).
- It is mentioned in the Instructions but its worth repeating here. Make sure you copy the exact Security Encryption Type and Encryption code as the Wireless Modem Router to your new Wireless Access Point.
The ROOT AP SSID is your Wireless Network Name defined in your Modem Router. This is the name you see when you search for available Wireless Services. For example, "MordechaiNetwork".
The ESSID is the Wireless Network Name you wish to give to your new Wireless Access point Repeater device. I'd suggest something similar to your original Service such as "MordechaiRepeater".
 |
| Default User/Password (marked in yellow) |
The two points within the Instructions which need further explanaton are:
1. On Page 5, the instructions refer to an ESSID and a ROOT AP SSID with no attempt to explain what these are.
The ROOT AP SSID is your Wireless Network Name defined in your Modem Router. This is the name you see when you search for available Wireless Services. For example, "MordechaiNetwork".
The ESSID is the Wireless Network Name you wish to give to your new Wireless Access point Repeater device. I'd suggest something similar to your original Service such as "MordechaiRepeater".

2. On Page 6 (the last page in fact) there ought to be a far better explanation to check that your repeater Access Point is working properly.
The best way to do this is:
a. Use your computer (which should be connected by a Network cable to the Modem Router) or your laptop (which is connected to your original wireless Network service) to log into the Access Point using its newly configured IP address. If you succeed then you know that the Access Point has Wireless to Wireless connection to your Modem Router.
b. Take your laptop or a second laptop to a point near the new Access Point and search for available Wireless Services. Looking at the list of available Wireless Services, what you ought to see is the name of the new Access Point Wireless Service (eg called MordechaiRepeater) listed with maximum signal strength. (You may probably also see your original Wireless Service (eg. MordechaiNetwork) at an obviously poorer signal strength).

That's it! You now have two Wireless Services connected to the same Network.
The best way to do this is:
a. Use your computer (which should be connected by a Network cable to the Modem Router) or your laptop (which is connected to your original wireless Network service) to log into the Access Point using its newly configured IP address. If you succeed then you know that the Access Point has Wireless to Wireless connection to your Modem Router.
b. Take your laptop or a second laptop to a point near the new Access Point and search for available Wireless Services. Looking at the list of available Wireless Services, what you ought to see is the name of the new Access Point Wireless Service (eg called MordechaiRepeater) listed with maximum signal strength. (You may probably also see your original Wireless Service (eg. MordechaiNetwork) at an obviously poorer signal strength).

That's it! You now have two Wireless Services connected to the same Network.
Final Points
Apart from the appalling lack of instructions that come in the box, my only other criticism is that there is no indication of Wireless reception strength on the front display of the EW-7206. The Access Point Wireless strength could be showing maximum strength but there is no way of knowing what the Wireless strength of the Access Point to the Modem Router is and therefore the actual connection quality. This is an oversight in the design of the device which I hope will be addressed in later models.